At first glance, a smart board interactive whiteboard may seem like an intimidating piece of technology to use – but Speechi is here to debunk this myth.
In actuality, smart boards are just giant versions of tablets, but much more versatile and designed for use by multiple people at once.
Speechi whiteboards are also powered by Windows and Android operating systems, depending on which model you pick—which will also naturally influence your overall interactive digital whiteboard price—so in fact, it’s likely that you will already have used an interface similar to what we offer.
When it comes to getting started with your smart whiteboard, you can simply power it on and begin using it – it really is that simple! Aside from very common settings like default language options, there’s no calibration or configuration required.
This tutorial is designed to outline all the common day-to-day functions of Speechi smart boards, so you can get the very most out of your smart whiteboard straight away.
How to use a smart whiteboard – homepage icons

On startup, the first thing you will see is your smart whiteboard’s homepage. This will include the most commonly-used apps, e.g., a web browser, the Note app for a blank whiteboard background, the Speechi Store for finding and downloading software, and the Finder icon for browsing documents.
Simply tap once on the icon of your choice to open the program.
How to use a smart whiteboard – shortcut sidebar

On the far left-hand side of your screen, you will see a mini sidebar tab – usually a light-blue square with a circle inside it. By tapping on it with your fingertip or stylus, a range of options will appear in a grid format.
The house icon will take you to the homepage, the cogwheels will open your device’s settings, the pencil icon will bring up a set of drawing tools, and the full-screen icon will maximise whichever window you currently have open. It’s worth trying out each of these icons to get used to how they work.
How to use a smart whiteboard – connecting it to your PC

There are both wired and wireless options for connecting your PC or laptop to your Speechi smart board. Beneath the screen itself and at the front, you will find a range of USB and HDMI ports. To establish a wired connection to your PC or laptop, simply use a USB or HDMI cable – but please note that you would need something sturdy to place your device on nearby.
For a wireless connection, you can simply use a wireless USB transmitter. In this case, the transmitter plugs into your laptop or PC, and in one click, you can cast your PC or laptop screen onto your smart whiteboard.
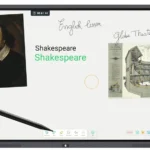
How to use a smart whiteboard – drawing, annotating, and erasing
To draw and annotate content on your screen, simply use the drawing tool to select a brush/pen type and a colour.
There are several options available to choose from, and you can also select the colours you want via a gradient colour wheel. Several users can also draw and annotate on the screen at once using their fingertip or a stylus.
To erase your drawing, writing or annotations, simply use the back of your hand to swipe the smart board and it will erase any marks in that area.
How to use a smart whiteboard – connecting it to the internet
To connect your smart board to your Wi-Fi network, simply tap on the Settings icon.
The top set of options will be your network settings, and by clicking on Wi-Fi, you will see the option to connect.
You can also connect your smart whiteboard to the internet with the Ethernet option, and turn it into a wireless hotspot if you’re struggling to connect other smart devices to the internet.