Would you like to enhance your lesson materials with a few animations to make a session stand out from the ordinary? To engage your students in a new project, maintain their attention, and spark curiosity, we’ll show you how to make your presentation shine on the Iolaos digital whiteboard by adding animations.
The Animation Section
In the sub-section called Animation, you can set the animation style and duration for your image — to make it appear, disappear, and/or react. The latter setting is meant for elements that are already visible on your whiteboard but on which you want to draw attention.
The List Section
In the second sub-section, List, you’ll find all the animations you’ve created. You can preview each animation by selecting it and clicking the Play button. You can also change the order in which animations play.
Presentation Mode
From the Menu, click on Presentation to see the result. Click the arrow on the right side of the screen to trigger each animation.
For all basic actions not covered in this tutorial, please refer to the article Preparing Your First Teaching Materials on PC with Iolaos.
Animating Multiple Elements (↑)
Now that we’ve gone over the basics, let’s take it up a notch by managing the animation of several elements — to better understand how the animation list works.
List Features
The List section of the Animation tab lets you perform four possible actions on the selected element of your whiteboard. Let’s look at a concrete example with the text “Edgar Allan Poe.”
I select the text on my whiteboard, open its properties panel, and go to the animation list. I can then:
- … change its position relative to other animations (up/down arrows)
- … delete its animation (trash can icon)
- … create its animation by clicking on one of the listed animations to copy its effects (animation style + duration)
… edit its animation (if previously created) by clicking on one of the listed animations to retrieve its effects (animation style + duration)
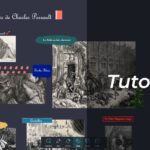
Example: Animating a Lesson Support (↑)
Here, we imagined a lesson support for a French class to introduce an independent reading activity centered on the theme of the ghost.
💡 Additional Tips and Advice (↑)
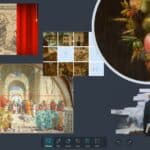
- Take advantage of Iolaos’s built-in image library. It offers a large collection of images covering many themes, helping you easily and quickly illustrate your materials, whatever your subject area.
- Lock elements that won’t be animated on your slide. This prevents accidentally moving them with your mouse, allowing you to work smoothly on animations without disturbing surrounding elements. This tip is especially useful when layering several objects — for example, a speech bubble displaying successive book summaries.
- Group elements you want to appear/disappear/react simultaneously. Example: the book cover + the author’s photo + the book summary. To group elements, hold down the Ctrl key on your keyboard, click the desired items, open their properties panel, go to the Layout tab, and click Group.
You now have all the tools you need to create animated lesson materials! To go further and find ideas to enrich your resources in Iolaos, don’t hesitate to check out our other related articles.
For more articles on Iolaos (↑)
- Iolaos Tutorial No. 1: Preparing Your First Teaching Materials on Iolaos (PC)
- Iolaos Tutorial No. 2: Creating Interactive Exercises for Your Classroom Interactive Display
- Teach Writing on the Interactive Display with Iolaos Whiteboard Software
- The Hidden Features of Maps in iolaos (Geography and Life Sciences)
- Using a Document Camera with the Iolaos Whiteboard Software
- Teaching Math with Iolaos Tools (1/2)
- Teaching Geometry with Iolaos Tools (2/2)
- Studying an Image in Class with the Iolaos Whiteboard
- Discover the Solar System with Iolaos
- Opening Flipchart Files on the Iolaos Whiteboard Software
- IOLAOS : the 3 advantages of our new educational software for teaching on a Speechi interactive display
Published on 14 October 2025