Which tools and features of the Iolaos digital whiteboard can be useful for math teachers when teaching geometry from elementary school to high school? In this article, we explain where to find them and how to use them. For more information on all the other math tools, please refer to our previous article, Teaching Math with Iolaos Tools (1/2).
1. Overview of Geometry Tools in Iolaos
To access all the geometry tools presented below, click on Tools and go to the Toolbar tab.

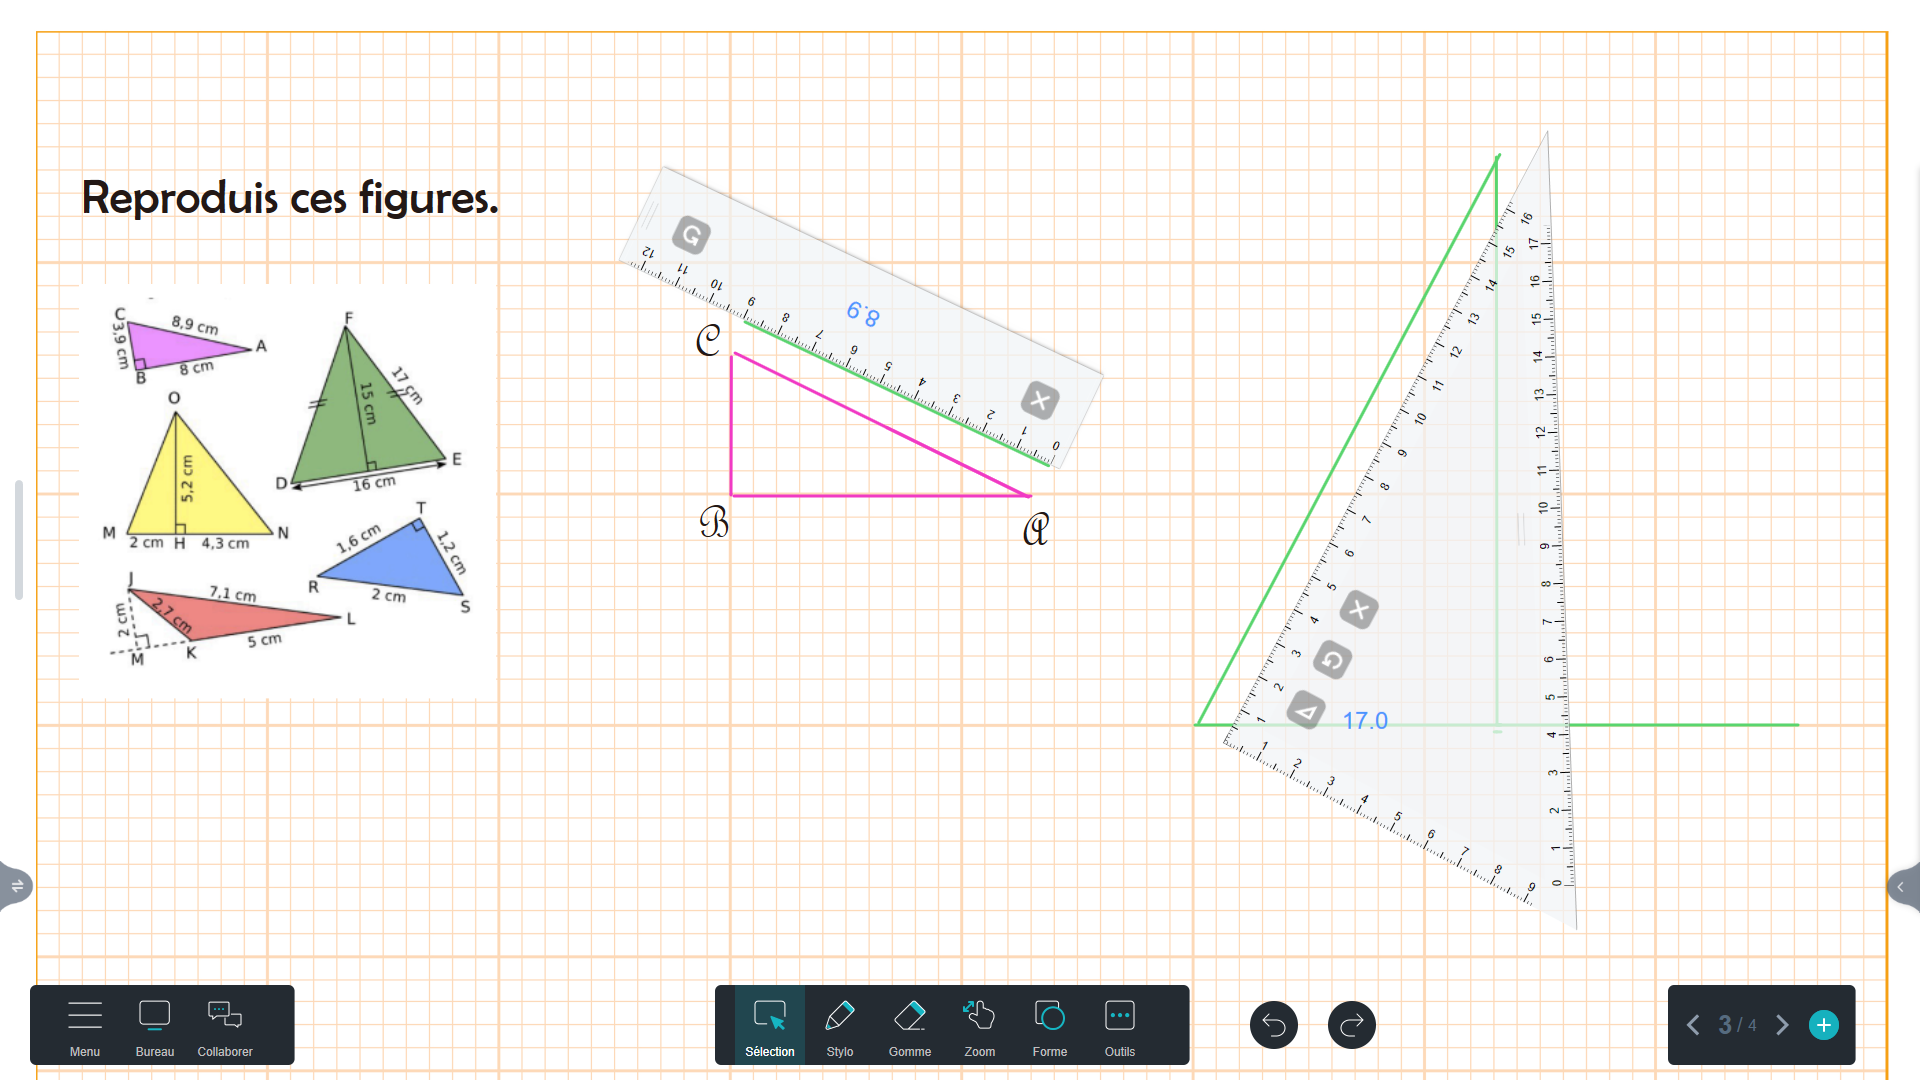
1. Ruler
2. Set square
3. 180° protractor
4. Compass
5. 180° geo-triangle protractor
6. 360° protractor


Move the ruler by pressing and holding your mouse or finger on the highlighted area.
Resize the ruler from 7 cm to 30 cm. Press and hold on the two lines at the right edge and stretch the ruler.
Rotate the ruler by holding down the right mouse button. The inclination angle is displayed in blue on the ruler.
To draw a line:
- Set the line color by double-clicking on Pen in the central toolbar.
- Drag your finger or mouse along the graduated edge.
- The ruler displays the length of your line in centimeters in blue.


Move the set square by pressing and holding your mouse or finger on the highlighted area.
Rotate the set square by holding down the middle mouse button. The angle is displayed in blue on the set square.
Resize the set square by pressing on the two lines along the hypotenuse and stretching it upward or downward.

Transform the set square into an isosceles set square by clicking the button on the far left.
To draw a line, set the line color by double-clicking on Pen in the central toolbar. Drag your finger or mouse along the graduated line. The set square displays the length of your line in centimeters in blue.


Move the protractor by pressing and holding your mouse or finger on the highlighted area.
Resize the protractor by pressing on the two lines on its right edge and stretching it.
Rotate the protractor by holding down the right mouse button. The inclination angle is displayed in blue.

- Position the protractor arms as needed (the angle is shown in blue on the tool).
- Click the middle button to draw the angle.
Draw a line by dragging your finger or mouse along the graduated edge. You can pre-select the line color in Pen.


Move the compass on the page by clicking the left leg or the handle.
Position the pencil leg where you want before drawing by clicking on the right leg.
Adjust the compass opening to the desired length—displayed in blue—by clicking the double-arrow on the right leg.
Set the line color by clicking on the colored rectangle on the pencil, then draw your circle by clicking the pencil.
5.2. Setting the Compass Drawing Style (↑)
Click on the small icon just above the pencil to choose one of the three available drawing styles.

6. A Few Geometric Backgrounds in Iolaos (↑)
The Iolaos whiteboard software offers many background options, including ones for geometry exercises. To learn more about backgrounds in Iolaos, check out this article.

Large square grid

Small square grid
Graph paper
7. Teaching Geometric Figures (↑)
7.1. Plane Figures and Solids (3D Shapes) (↑)
Click on Tools in the main toolbar, go to the Toolbar tab, and click on 3D shapes.

Segment, circle, angle, freeform figure
The first row allows you to draw plane figures (segment, circle, angle, and freeform figure). Click on the displayed angles to make them appear or disappear.
Cube, rectangular prism, cylinder, cone, sphere, pyramid...
7.2. Drawing Shapes(↑)
Click on Shape in the central toolbar.

Step 1 : First adjust the appearance of your shape on the right side of the window.
- In the Border tab, choose the outline color, thickness, and opacity.
- In the Fill tab, choose the fill color and opacity.
Step 2 : Select the shape to draw from the left side of the window.
- Once selected, you can click once on the slide to insert a shape…
- …Or hold your finger or click down to set your desired dimensions.
- Move the shape on the slide by clicking the Select button in the toolbar.
7.3. Shape Recognition (↑)
First select the desired line color in Pen, then go to Shape and click on the icon showing a stylus drawing a circle. Then freely draw any geometric shape by hand.

8. Working with Worksheets Using a Document Camera (↑)
If you want to demonstrate the use of geometric tools to your students as if they were watching over your shoulder, it’s possible using a document camera with Iolaos!

- Connect a document camera to your PC or your interactive whiteboard.
- In Iolaos, click on Tools, then Camera in the General Tools tab.
- A new window will open. If the camera image doesn’t show up right away, click on Camera, then on Document Camera.
To explore all the features of the Camera tool in Iolaos, we recommend reading:
Tutorial: Using a Document Camera with the Iolaos Whiteboard Software.
For more articles on Iolaos
- Iolaos Tutorial No. 1: Preparing Your First Teaching Materials on Iolaos (PC)
- Iolaos Tutorial No. 2: Creating Interactive Exercises for Your Classroom Interactive Display
- Teach Writing on the Interactive Display with Iolaos Whiteboard Software
- The Hidden Features of Maps in iolaos (Geography and Life Sciences)
- Using a Document Camera with the Iolaos Whiteboard Software
- Teaching Math with Iolaos Tools (1/2)
- Opening Flipchart Files on the Iolaos Whiteboard Software
- IOLAOS : the 3 advantages of our new educational software for teaching on a Speechi interactive display
Posted on May 16, 2025.