Table of Contents
- Iolaos and the SpeechiCam 7: A Teacher’s Best Allies
- 10 Tips for Using a Document Camera with Iolaos
- 1. Retrieving the document camera image in Iolaos
- 2. Adjusting image display
- 3. Taking a photo capture and freezing the image
- 4. Inserting a document camera capture into an Iolaos slide
- 5. Writing and erasing
- 6. Moving the image
- 7. Comparing images
- 8. QR Code reader
- 9. Temporarily exiting the document camera
- 10. Closing the document camera
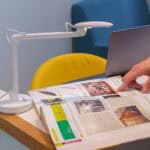
The SpeechiCam 7: Our Pocket-Sized 4K Document Camera
This tutorial was created using our SpeechiCam 7, the best-selling visualization tool for schools! With its articulated arm, mini 4K-resolution camera, and built-in LED light, the SpeechiCam 7 is perfect for the most common classroom uses. Small and foldable, it fits in a bag and can accompany the teacher anywhere.
Iolaos and the SpeechiCam 7: A Teacher’s Best Allies (↑)
Before diving into the tutorial, let’s consider two key situations where a teacher might benefit from using a document camera with Iolaos.

A Document Camera with Iolaos for Preparing Lessons on a PC
When creating lesson materials at home, an overhead document camera is very useful for capturing excerpts from textbooks, books, student papers, or even objects and experiments.
This process is much faster and less tedious than using a scanner or smartphone. Simply plug the document camera into your PC via USB and take snapshots directly from Iolaos to insert them into your slides with a single click.

A Document Camera with Iolaos for Teaching in Class on an Interactive Whiteboard
Whether it’s due to a broken photocopier preventing you from distributing handouts or students forgetting their textbooks at home, a document camera is an invaluable classroom tool.
Used with Iolaos, the document camera provides interesting and easy-to-implement educational opportunities, such as the ability to compare multiple images side by side.

- Click on Tools in the central toolbar, then click Camera.
- A new window will open.
If your PC or interactive whiteboard has a built-in camera, the software may default to that instead of your document camera.
In that case, in the new window’s toolbar:
- Click Camera.
- From the dropdown list, select Document Camera.
- The image from your document camera will now be displayed!
2. Adjusting Image Display(↑)
2.1. Full-Screen Image. To maximize viewing space:
- Hide the preview column on the right by clicking Preview in the toolbar.
- Minimize the toolbar by clicking the arrow at the top.

2.2. Zoom, Rotate… The toolbar offers several ways to adjust the document camera image:

- Click Settings to open a window with various options.
- Zoom: Use the + and – buttons or reset to normal view.
- Rotate: Click the rotation buttons to rotate the image by 90°.
- Brightness: Adjust brightness using the + and – buttons.
You can also zoom in/out using your mouse scroll wheel, trackpad, or touchscreen gestures on an interactive whiteboard.
3. Taking a Photo Capture and Freezing the Image (↑)
3.1. Taking Photo Captures. Click Photo to capture an image: The capture will appear in the right preview column.

The bottom-most thumbnail (marked with a camera icon) is the live camera feed. Above it, all your captures are displayed.
3.2. Freezing the Image. Click Freeze. To return to the live view, uncheck Freeze, then click the bottom preview thumbnail.

4. Inserting a Document Camera Capture into an Iolaos Slide (↑)
In the Preview column, each capture has a small arrow in the top right corner.
- Click the arrow of the capture you want to insert.
- Click Confirm—your capture is now on an Iolaos slide!

5. Writing and Erasing (↑)

To annotate captures:
- Click Pen.
- Click again to open the submenu (choose from 3 stroke widths and 9 colors).
To erase annotations:
- Click Eraser and erase with your mouse or finger.
- To erase all annotations, click Eraser again and slide the bar to the right.
6. Moving the Image (↑)
Iolaos’ Camera feature lets you make room around the image to reclaim table space and make annotations.
- Click Drag in the toolbar.
- Move the image by holding the left mouse button or dragging with your finger.

You can also resize the image using the mouse scroll wheel or touchscreen gestures.
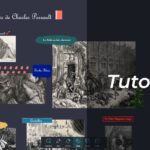
7. Comparing Images (↑)
Iolaos allows up to four images to be compared side by side.
- Click Compare in the toolbar.
- Select images from the preview column.

- For better visibility, hide the preview column and minimize the toolbar.
- You can compare multiple photo captures or a live document camera feed alongside photo captures.
- You can still zoom, move, annotate, and erase on each compared image.

If you click on one of the images being compared, an icon will appear in the top right-hand corner, allowing you to enlarge the image.

Once enlarged, you can return to the comparative view by clicking on the icon at the bottom left.
8. QR Code Reader (↑)
- Place a QR code under the document camera and click QR Code in the toolbar.
- In the pop-up window, click Open Page.

9. Temporarily Exiting the Document Camera
Click Minimize.

10. Closing the Document Camera (↑)
Click Menu, then Exit.

For more articles on Iolaos
- – Iolaos Tutorial No. 1: Preparing Your First Teaching Materials on Iolaos (PC)
- – Iolaos Tutorial No. 2: Creating Interactive Exercises for Your Classroom Interactive Display
- – Teach Writing on the Interactive Display with Iolaos Whiteboard Software
- – The Hidden Features of Maps in iolaos (Geography and Life Sciences)
- – Opening Flipchart Files on the Iolaos Whiteboard Software
- – IOLAOS : the 3 advantages of our new educational software for teaching on a Speechi interactive display